使用mkdocs创建一个简单的博客系统
本文将介绍如何使用mkdocs创建静态博客。
前言
每个做技术的都希望有一个属于个人的小站点,不管是写一些随笔,还是记录技术总结,但是又不想弄得很复杂。这篇文章也许会帮到你。
本博客使用的技术栈为mkdocs + material 主题,配合 giscus 评论系统搭配而成,听起来是不是感觉非常复杂,放心,只会涉及一些简单的命令。
安装mkdocs
首先是安装mkdocs ,它是python 编写的一个基于Markdown 文档的静态站点生成器。
使用pip 进行安装即可
首先需要安装python : https://www.python.org/
创建新项目
使用mkdocs new new-project ,即可创建一个空的new-project 项目 。
| Bash |
|---|
| # mkdocs new new-project
INFO - Creating project directory: new-project
INFO - Writing config file: new-project/mkdocs.yml
INFO - Writing initial docs: new-project/docs/index.md
#
|
创建new-project 新项目后,目录格式如下:
| Bash |
|---|
| # tree new-project/
new-project/
├── docs
│ └── index.md
└── mkdocs.yml
1 directory, 2 files
#
|
其中
mkdocs.yml :主配置文件docs:静态文档目录
实时预览
mkdocs 提供了内置web 服务器,以便在编写文档的时候可以实时浏览文档,在新项目目录下,使用如下命令即可启动该web 服务器:
| Bash |
|---|
| $ cd new-project/
$ mkdocs serve
INFO - Building documentation...
INFO - Cleaning site directory
INFO - Documentation built in 0.14 seconds
INFO - [15:14:07] Watching paths for changes: 'docs', 'mkdocs.yml'
INFO - [15:14:07] Serving on http://127.0.0.1:8000/
|
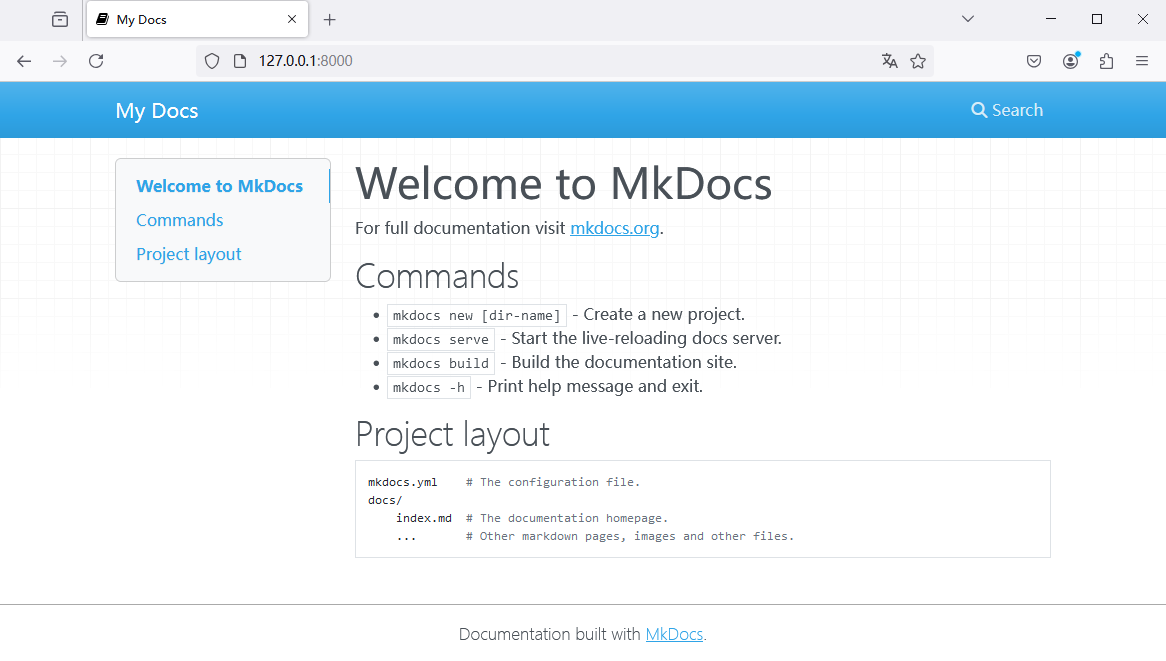
此时若打开该网页,会看到默认的主页:
生成网页文件
若文档编写完后,想要部署到静态服务器上,可以将其生成静态站点,而后部署到静态服务器即可,例如:
| Bash |
|---|
| # cd ..
# cd new-project/
# mkdocs build
INFO - Cleaning site directory
INFO - Building documentation to directory: /mnt/j/new-project/site
INFO - Documentation built in 0.09 seconds
#
|
此时会在当前目录下,生成site 目录,而该在目录下,是生成一系列的静态文件。
| Bash |
|---|
| # tree site
site
├── 404.html
├── css
│ ├── base.css
│ ├── bootstrap.min.css
│ ├── bootstrap.min.css.map
│ ├── brands.min.css
│ ├── fontawesome.min.css
│ ├── solid.min.css
│ └── v4-font-face.min.css
├── img
│ ├── favicon.ico
│ └── grid.png
├── index.html
├── js
│ ├── base.js
│ ├── bootstrap.bundle.min.js
│ ├── bootstrap.bundle.min.js.map
│ └── darkmode.js
├── search
│ ├── lunr.js
│ ├── main.js
│ ├── search_index.json
│ └── worker.js
├── sitemap.xml
├── sitemap.xml.gz
└── webfonts
├── fa-brands-400.ttf
├── fa-brands-400.woff2
├── fa-regular-400.ttf
├── fa-regular-400.woff2
├── fa-solid-900.ttf
├── fa-solid-900.woff2
├── fa-v4compatibility.ttf
└── fa-v4compatibility.woff2
5 directories, 29 files
#
|
配置blog主题
mkdocs-material 是mkdocs 使用最多的第三方主题,其内置了blog 插件可供直接调用。
安装mkdocs-material
使用pip 即可安装该主题
| Bash |
|---|
| # pip3 install mkdocs-material
|
创建blog必要的目录
使用mkdocs-material的博客插件,需要新建docs/posts 目录,以便插件能够扫描该目录下所有的Markdown 文件。
| Bash |
|---|
| # cd ..
# cd new-project/
# mkdir -p docs/posts/
# tree docs/
docs/
├── index.md
└── posts
1 directory, 1 file
#
|
配置mkdocs.yml
该配置文件默认只有一项配置:site_name,也是唯一必须要有的一项。
| Bash |
|---|
| # cat mkdocs.yml
site_name: My Docs
#
|
在此基础上,新增theme 和plugins 配置为blog 类型
配置如下
| YAML |
|---|
| # cat mkdocs.yml
site_name: My Blog
theme:
name: material
plugins:
- blog:
blog_dir: .
#
|
上述内容是一个最基本的blog 配置,含义是mkdocs 使用了mkdocs-material 主题,并且启用了blog插件,blog 的根目录为当前目录。
编写第一篇博客
关于更多的内容可以参考: mkdocs-material-setting-up-a-blog
在开始之前,需要先清理掉docs/index.md 的内容,以免造成干扰。
新增第一篇博客
在/docs/posts/ 中可以编写第一篇文档了。
| Bash |
|---|
| # cat >> docs/posts/hello_mkdocs.md << EOF
> ---
> date: 2024-10-18
> categories:
> - hello
> draft: false
> ---
>
> # Hello Mkdocs
>
> 这是编写的第一篇文档
>
> <!-- more -->
>
> 正文开始...
> EOF
#
|
博客元数据
文档的内容如下:
| Bash |
|---|
| # cat docs/posts/hello_mkdocs.md
---
date: 2024-10-18
categories:
  - hello
draft: false
---
# Hello Mkdocs

这是编写的第一篇文档

<!-- more -->
正文开始...
#
|
其中--- 包含的是博客的元信息
| Bash |
|---|
| ---
date: 2024-10-18
categories:
- hello
draft: false
---
|
date: 文档的日期categories: 文档的分类draft: 是否是草稿
接下来便是摘要
| Bash |
|---|
| # Hello Mkdocs
这是编写的第一篇文档
<!-- more -->
|
<!-- more --> 标签之上的内容,便是摘要。
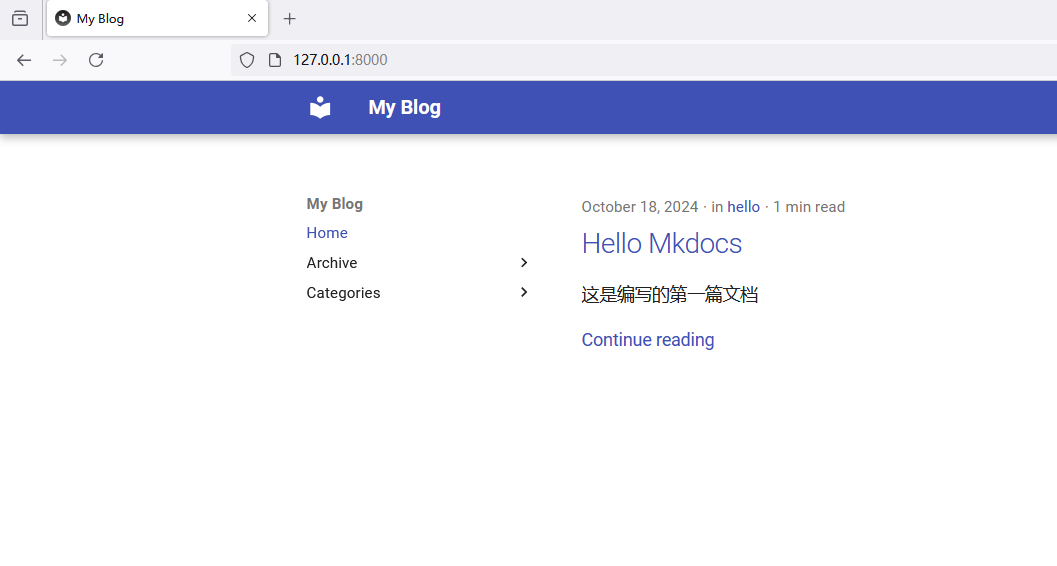
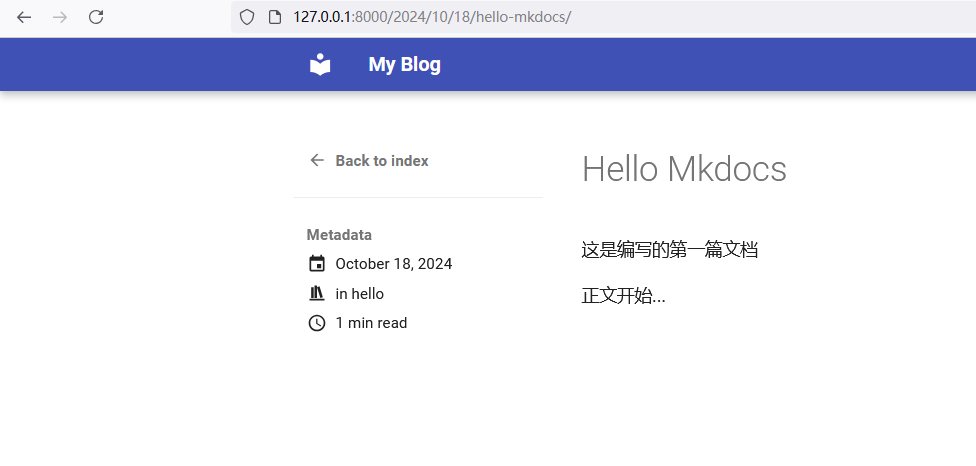
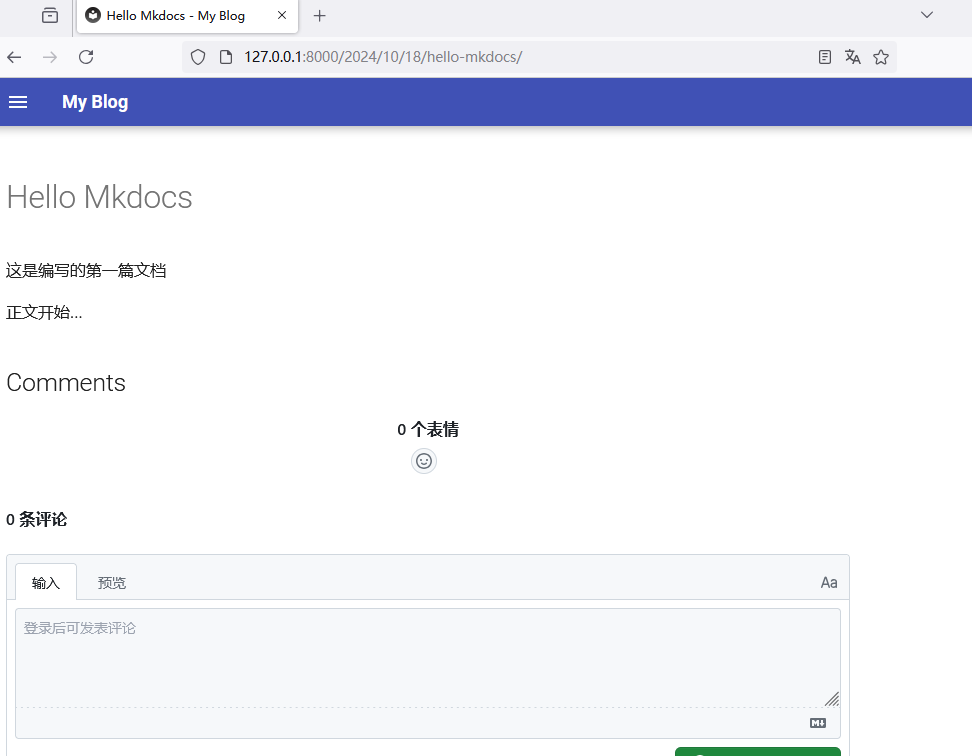
实际效果展示
完成后,便可以使用mkdocs serve 查看实际的效果了。
新增giscus评论系统
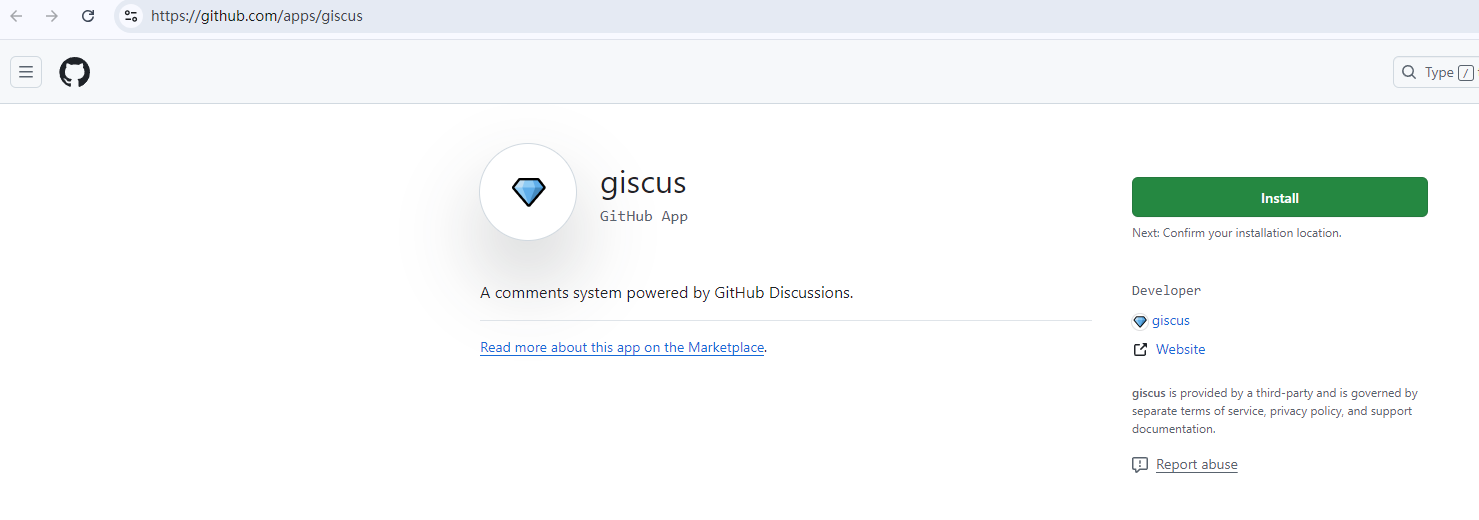
giscus 是github的一个应用程序,由GitHub Discussions提供支持的评论系统。
由于是基于github 的,所以需要先在网页上登录github 才能进行后续的操作。
安装giscus
使用浏览器打开https://github.com/apps/giscus打开该页面,选择Install 进行安装
点击安装后,会提示对于哪些存储库有权限,由于是给mkdocs 使用,所以给定一个预先创建好的仓库即可。
最后点击Install 即可安装。
生成giscus配置文件
打开https://giscus.app/zh-CN即可配置该giscus ,输入仓库信息,选择映射关系,即可生成配置文件。
将giscus集成到mkdocs上
覆盖原始comments.html 文件,新建overrides/partials/comments.html 文件。
| Bash |
|---|
| # cd ..
# cd new-project/
# mkdir -p overrides/partials/
#
# touch overrides/partials/comments.html
#
|
编辑comments.html 文件,首先键入模版内容:
| Bash |
|---|
| # cat overrides/partials/comments.html
{% if page.meta.comments %}
<h2 id="__comments">{{ lang.t("meta.comments") }}</h2>
<!-- Insert generated snippet here -->
<!-- Synchronize Giscus theme with palette -->
<script>
var giscus = document.querySelector("script[src*=giscus]")
// Set palette on initial load
var palette = __md_get("__palette")
if (palette && typeof palette.color === "object") {
var theme = palette.color.scheme === "slate"
? "transparent_dark"
: "light"
// Instruct Giscus to set theme
giscus.setAttribute("data-theme", theme)
}
// Register event handlers after documented loaded
document.addEventListener("DOMContentLoaded", function() {
var ref = document.querySelector("[data-md-component=palette]")
ref.addEventListener("change", function() {
var palette = __md_get("__palette")
if (palette && typeof palette.color === "object") {
var theme = palette.color.scheme === "slate"
? "transparent_dark"
: "light"
// Instruct Giscus to change theme
var frame = document.querySelector(".giscus-frame")
frame.contentWindow.postMessage(
{ giscus: { setConfig: { theme } } },
"https://giscus.app"
)
}
})
})
</script>
{% endif %}
#
|
接着将上述生成的giscus 配置文件,编辑到上述comments.html文件中的<!-- Insert generated snippet here --> 和<!-- Synchronize Giscus theme with palette --> 之间。
完整的内容为:
| Bash |
|---|
| # cat overrides/partials/comments.html
{% if page.meta.comments %}
<h2 id="__comments">{{ lang.t("meta.comments") }}</h2>
<!-- Insert generated snippet here -->
<!-- giscus.app/client.js 相关代码 -->
<!-- Synchronize Giscus theme with palette -->
<script>
var giscus = document.querySelector("script[src*=giscus]")
// Set palette on initial load
var palette = __md_get("__palette")
if (palette && typeof palette.color === "object") {
var theme = palette.color.scheme === "slate"
? "transparent_dark"
: "light"
// Instruct Giscus to set theme
giscus.setAttribute("data-theme", theme)
}
// Register event handlers after documented loaded
document.addEventListener("DOMContentLoaded", function() {
var ref = document.querySelector("[data-md-component=palette]")
ref.addEventListener("change", function() {
var palette = __md_get("__palette")
if (palette && typeof palette.color === "object") {
var theme = palette.color.scheme === "slate"
? "transparent_dark"
: "light"
// Instruct Giscus to change theme
var frame = document.querySelector(".giscus-frame")
frame.contentWindow.postMessage(
{ giscus: { setConfig: { theme } } },
"https://giscus.app"
)
}
})
})
</script>
{% endif %}
#
|
同时,还需要修改mkdocs.yml 在theme 中新增custom_dir 参数,完整的配置参数为:
| Bash |
|---|
| # cat mkdocs.yml
site_name: My Blog
theme:
name: material
custom_dir: 'overrides'
plugins:
- blog:
blog_dir: .
#
|
custom_dir 参数的作用是覆盖原始模版文件。
为博文开启评论框
还记得创建hello_mkdocs.md 的元信息吗?
| Bash |
|---|
| # head docs/posts/hello_mkdocs.md
---
date: 2024-10-18
categories:
- hello
draft: false
---
# Hello Mkdocs
这是编写的第一篇文档
#
|
仅需要在元信息上添加comments: true 即可,新增评论框。
修改后的文件为:
| Bash |
|---|
| # head docs/posts/hello_mkdocs.md
---
date: 2024-10-18
categories:
- hello
draft: false
comments: true
---
# Hello Mkdocs
#
|
打开网页,便可以进行评论了。
关于RSS的文档,参考如下: https://squidfunk.github.io/mkdocs-material/setup/setting-up-a-blog/#rss
RSS 对于博客而言,非常重要,可以方便用户订阅网站RSS feed,接下来便介绍如何开启RSS 。
安装插件
| Bash |
|---|
| # pip3 install mkdocs-rss-plugin
|
在mkdocs.yml中新增关于RSS 信息的参数。
| Bash |
|---|
| plugins:
- blog:
blog_dir: .
- rss:
match_path: /*
categories:
- categories
- tags
use_git: false
|
其参数的作用为开启rss 。
match_path:: 匹配 指定 目录下的文档。categories : feed 类别。use_git: 禁用git 。
其完整参数为:
| Bash |
|---|
| # cat mkdocs.yml
site_name: My Blog
theme:
name: material
custom_dir: 'overrides'
plugins:
  - blog:
      blog_dir: .
  - rss:
      match_path: /*
      categories:
        - categories
        - tags
      use_git: false
#
|
效果展示
完成后,便可以使用mkdocs serve 查看实际的效果了。
在浏览器中输入127.0.0.1:8001/feed_rss_created.xml便可以查看该站点的RSS信息了。
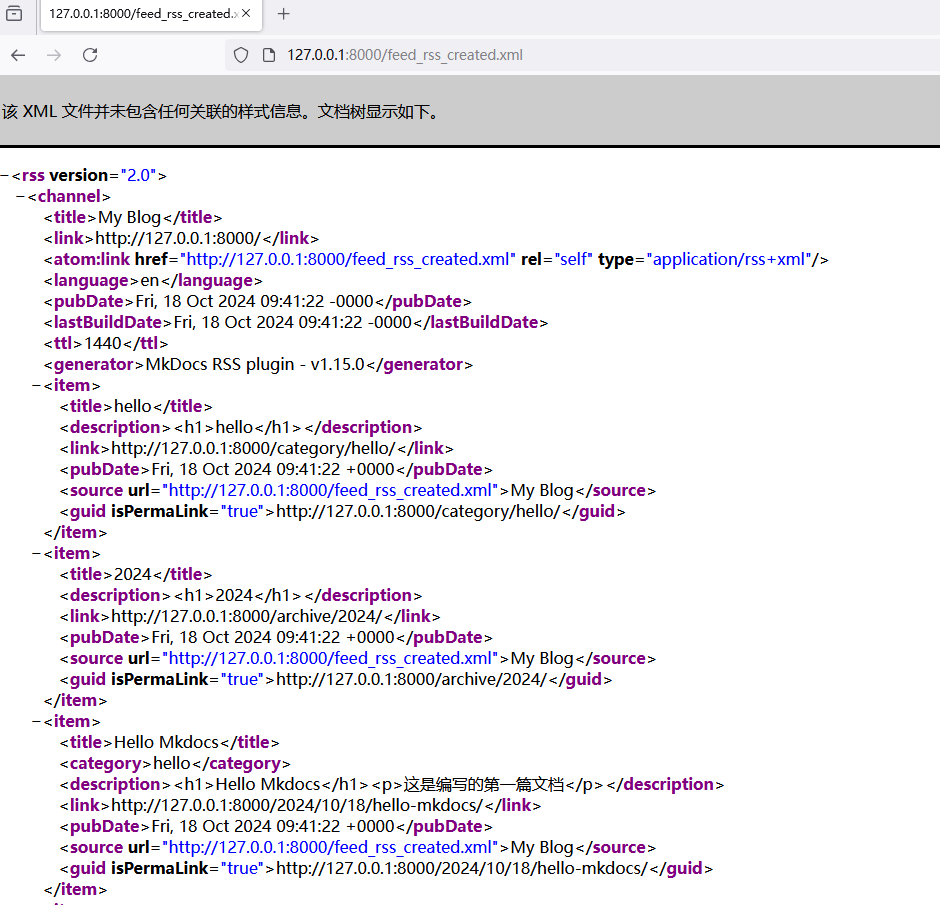
如上,则证明该RSS 配置成功。
总结
一个最最最简单的使用mkdocs 创建博客系统的案例就结束了,简单的总结一下:
首先mkdocs 是基于python 的第三方软件,所以需要依赖其python 环境,所以需要使用该工具,得先安装python。
https://www.python.org/
其次使用的博客系统是源于mkdocs 的第三方主题material,也是需要额外安装的。
https://github.com/squidfunk/mkdocs-material
接着便是导入了Giscus评论系统,它是github中的一个应用软件,需要先到github上进行安装,而后到https://giscus.app/zh-CN进行配置,获取到相关的配置文件,最后通过覆盖mkdocs 原始文件的方式集成到mkdocs 中。需要注意的是,覆盖mkdocs 需要修改mkdocs.yml配置文件,在theme 中引入custom_dir 相关配置。
最后便是集成了RSS,它也是一个第三方插件,需要进行额外安装,安装完毕后,需要在plugins 中进行配置RSS 相关信息。